Translate this page

Monday, April 25, 2011

How to delete or break administator password.


1 comments


This post will tell you how to break “administrator Password” of someone’s pc.
There are two ways to do this.
First way:-
1.       Boot up pc with command prompt.
2.       Change your directory into c:\windows\system32\config
3.       Now delete “sam.exe” and “sam.log” files
Write del sam.exe
And write del sam.log
4.       Now boot pc with window and password will be blank.
Note:- this will work only if the hard drive is of FAT type.

Second way:-
1.       Remove the hard disk from the cpu.
2.       Attach this hard disk with another pc. And make this hard disk secondary.
3.       Now boot pc with window.
4.       Open the drive in which window of secondary hard disk Is installed.
5.       Open windows/system32/config.
6.       Delete sam.exe and sam.log.
7.       Now remove secondary hard disk and attach this with its own cpu.
8.       Now start window and password will be blank......

Thursday, April 21, 2011

How to use your keyboard as a mouse.


0 comments

Sometime you need to use keyboard as a mouse.  When your mouse stops working then you can enable your keyboard as a mouse. You can control mouse pointer with the keys of keyboard. This feature works in all windows such as window xp, 98, vista and window 7. Just follow below simple step. After that you can do your mouse work with the help of keys of keyboard.

1.       First of all log on your computer as an administrator.
2.       Now press alt+shift+NumLock  at once. Now you will receive a simple Mouse keys box. It will ask you to enable the mouse keys on keyboard.
3.       Now press the yes.
4.       Now you can use your keyboard as a mouse.
5.       Use your number keypad to operate your mouse.
·         Keys 1,2,3,4,6,7,8,9 are used for movement.
·         Key 5 used as a mouse left button.
·         key + is used as mouse right button.
·         Press 0 and the move your cursor for select.
·         Press and hold down the ctrl button for speed up.
·         Press and hold down the shift button for speed down
6.       You can change your mouse key setting. A mouse symbol will show in your right botton. Click on it then change your setting.
This post can be helpful for them who don’t like to work with mouse and whose mouse has been damaged or not working. If you like this post then share it with your friends and leave your comment here.....
                                                           

Tuesday, April 19, 2011

Microsoft Excel shortcuts


0 comments


Many professional uses the Microsoft excel for their work. Microsoft Excel makes their work easy and fast and easy to understand. It is used by the number of people in this world. Microsoft Excel uses the table to collecting the data and mange these data. It will be more easy when the people who uses the Excel know its shortcuts.
Many useful shortcuts are given below. They are described with their functions.


F5
Go to a specific excel cell
F11
Create the chart
F2
Edit selected cell
F7
Spell check for selected text
Ctrl+;
Enter current date.
Ctrl+Shift;
Enter current time.
Shift +F3
Open the formula window.
Shift +F5
BringUp search box.
Alt +Shift+F1
New worksheet insertion.
Ctrl +Page down
Move between Excel worksheets.
Ctrl +page up
Move between Excel worksheets.
Alt+=
Create formula for sum all above cells
Ctrl+tab
Move beteen two Open Excel files.
Ctrl +’
Insert the value of above cell into currently selected cell
Ctrl +shift +$
Format number in Currency format
Ctrl +shift +!
Format number in comma format
Ctrl +shift +#
Format numbers in date format
Ctrl +shift +@
Format number in time format
Ctrl +shift +^
Format number in scientific formats
Ctrl +shift +%
Format in percentage format
Shift +space
Entire row selection
Ctrl+space
Entire column selection
Ctrl +F6
Switch between open windows/workbooks.
Ctrl +f10
Maximize selected window
Ctrl +f9
Minimize current selected window
Ctrl +5
Strike through highlighted portion
Ctrl +P
Open print dialog box
Ctrl +z
 Undo last action
Ctrl+B
Bold selected text
Ctrl+A
Select all contents
Ctrl +I
Italic selected text.
Ctrl+k
 Insert link.
Ctrl +U
Underline selected portion.

just bookmark this page and enjoy your work in excel. it will be very helpful for you....
Learn how to hide your Disk Drive.

Sunday, April 17, 2011

How to hide your Disk Drive.


0 comments


Sometimes we don’t want to show our Disk Drive to another person. We need to hide this. You can hide your Disk Drive in few simple steps. You can implement this trick at any version of windows such as windows 98, xp, vista & window 7. You can unhide your drive whenever you want.
Follow these below steps:-
1.       Open your start menu. Click on Run.
2.       Type cmd(Command Prompt) in Run. You can open your command prompt from
Start>>all programs>>accessories>>command prompt
3.       Type Diskpart in cmd and hit the enter key. 
4.       Wait for few seconds it will open a Diskpart session.
5.       Type List volume for listing all volumes in your pc.( it will show your Disk drives as volume names)
6.       Select the volume which one you want to hide.
For example I am hiding my volume 2 with drive letter d.
write Select volume 2 and hit the enter key.( write your volume number in place of 2)
7.       Now type remove letter d and hit enter. (type your drive letter In place of d).
Now your work is completed .check your drive. Now it is hidden. If  not restart your computer then check it.
How to unhide Disk Drive:-
1.       Follow the above 1 to 5 steps.
2.       Now write assign letter d and hit the enter key. ( write your letter name in place of d).
Now check your disk drive in your window explorer. If doesn’t appeared, just restart your computer and then check it.

Learn how to unhide your hidden Folder Option.
Learn How to Lock your pc when you go away from it.
.
...

Saturday, April 16, 2011

How to enable Hidden Folder Option.


0 comments


Folder option is the important part of the windows. Number of people faces the missing folder option problem in their window explorer. They face this problem due to the virus or Trojan attack on their pc. This post may solve your problem…

Just follow below steps.


1.       Open run from start menu and type “gpedit.msc”. (Type it without quote). Now press enter.

2.       Go to User Configuration. Click on Administrative Template. Now open Windows Component and then Windows explorer.
User Configuration>>Administrative Template>> Windows Component>>Windows Explorer.
3.       In Windows Explorer you will find a list. Find here below line
"Removes the FolderOption menu item from the Tools menu"

Check its state. If its state is “not configured” then double click on it. A window will open. Set it “enabled” and then click on apply. Your work is not completed here. Again set it to “not configured”. And then click on OK.
 
Now restart your computer.
I hope you will find the folder option in your window explorer.......

Friday, April 15, 2011

how to use shortcut key to create new folder.


0 comments

If you want to create a new folder in your computer then you always click on right button of mouse then select new folder. It can be a time wasting for those who love to do their work with the keyboard shortcut.

I have a shortcut key method to create new folders and I am going to share it with you all.

You have to follow the below steps:-

  • Open your path or place where you want to create new folder.
  • Now press and hold the alt key and press F.
  • Now press W+F together to create new folder.
  • Now name it and your folder has been created.

You can do this easily.

A main disadvantage of this shortcut is that you can’t apply it at the desktop. You have to follow the simple method for creating the folder on desktop.

Wednesday, April 13, 2011

How to add floating buttons/icons on your blogger.


1 comments

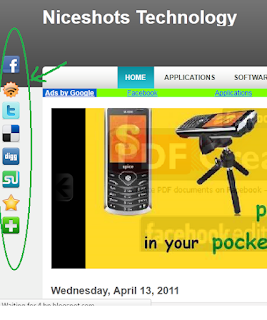
Floating buttons give a good and professional look to your website. You might have seen these cool floating buttons in many websites or blogs. One more benefit of these buttons is that it always stays in front of visitor’s eyes while they are scrolling from top to bottom of page or vice versa. It is very easy to add this buttons on your blog. You have to follow some below steps.

1. Make your own button image or download it from here. (Note: buttons should be in png format).

2. Upload these buttons/icons at one of following site

Tinypic.com

Imageshack.com

Photobucket.com

Or any another site which you know to upload the images.

I always use the tinypic.com for uploading images.

3. Get the url for uploaded images.

(Note: you will get the url of image on the uploaded site after uploading the images.)

4. Open your blogger account. Go into design tab. Click on Edit HTML

Now find the

</body>
in your html code and paste the below code before this.

//For Facebook

<a href="http://www.facebook.com/yourfacebooklink" style="bottom: 310px; display: scroll; left: 4px; position: fixed;" target="_blank" title="Follow Me on Facebook">

//For Twitter

<a href="http://twitter.com/enter_your_twitter_username" style="display:scroll; position:fixed; bottom:350px; left:4px;" target="_blank" title="Follow Me on Twitter">

//For dig

<a href="http://digg.com " style="display:scroll; position:fixed; bottom:390px; left:4px;" target="_blank" title="Digg This">
You can add another buttons in similar way like Rss field, stumble upon etc.

5. Change the link in double quoted of href into your link and change the src of image with your uploaded link of images.

6. You can change the position of the buttons from left to right. Just change the left:4px to right:4px

7. You can adjust the position from bottom. Change the 310px,350px etc with your required height. you can see the example at this blog.

Friends if you like this post. Then share it with your friends and share your comments here.

How to add facebook like button on blogger page.


0 comments


The most popular social plug-in launched by face book is like button, you will find this button at every website. In this post you will learn how to add and customize this button to your blogger blog.

How to add like button:-

Here I am writing the button code here.


<iframe allowTransparency='true' expr:src='"http://www.facebook.com/plugins/like.php?href=" + data:post.url + "&layout=standard&show_faces=false&width=100&action=like&font=arial&colorscheme=light"' frameborder='0' scrolling='no' style='border:none; overflow:hidden; width:450px; height:40px;'/>

Where to add this code in your blog?

Sign in your blogger account. Go into design tab. Open “Edit HTML”

Design>>Edit html

Click on Expand Widget Templates

Find the following code in your html code:-

<div class='post-header-line-1'/>

Now paste your button code after this code line.

If you will not find the above line then find next line

<data:post.body/>

And paste your button code Before this code line.

Click on SAVE TEMPLATE link.

you can see the example in this post.


You can customize it by changing the Arial font into one of the following fonts..

lucida+grande
segoe+ui
tahoma
trebuchet+ms
verdana

If you like this post then share it with your friends.

Sunday, April 10, 2011

How to create contact us page on blogger.


0 comments

If you have a blog or a website, Contact us page must be present on your blog so that the users of your blog can contact you. You can add your name and your email id on your contact us page but from this procedure visitors have to open their email account and then he will send you the mail. It will be more confertable for visitors that they can send you mail directly from your contact us page.
Blogger.com doesn't provide this facility. But EmailMeForm will help you to embed a customized contact me form on your blog.


Visitors will get a thank you page after sending the message.

Now you will get the email in your email account.

Steps to create contact me page:-
1. first of all you have to create a static page in your blogger account
go into "posting" and then "edit pages"

2. Now register to emailmeform to create the contact us form
3. Copy the code of this form and paste it into your contact us page.

it is very easy to setup your contact us page.

Window 7 wallpapers


0 comments

Subscribe

Subscribe to get free email updates...

Delivered by FeedBurner

 
Design by Free WordPress Themes | Bloggerized by Lasantha - Premium Blogger Themes | Grants For Single Moms
Facebook RSS Feed Twitter Delicious Digg Stumbleupon Favorites More